Monday, September 12, 2016

A Quick, All-Purpose Lemon Pan Sauce

Sauces make any dish better. A quick lemon pan sauce is delicious on many things - some pan sauteed fish, a chicken breast, a pork chop. You'll need:
  • about 1/3 cup of chicken stock (see Note below)
  • a few splashes of white wine, vodka or dry vermouth (optional, but adds a lot of flavor)
  • a tablespoon of capers (optional)
  • a tablespoon of chopped fresh parsley
  • 2 tablespoons lemon juice
  • a tablespoon of butter

After you have cooked your fish or chicken or pork, remove it to a plate. Turn the skillet to high.

When it is hot add the chicken stock and wine (or vodka, vermouth). Scrape the bottom of the pan to release the fond (the browned bits in the bottom). Boil it down to reduce by half.

Turn off the heat. 

Stir in the capers and lemon juice.

When the liquid has stopped boiling drop in the butter and swirl it around the pan. It will give the sauce some body.

Add the parsley and pour over the fish or chicken, etc.


NOTE: I hate to open a can of chicken broth and use only some of it. Of course, you can always freeze the rest, but you can also use a bouillon cube. Dissolve a half chicken bouillon cube in 1/3 cup boiling water (if making 1 serving of sauce).


...............................................................

Sunday, May 8, 2016

LENTILS

 A very trendy side you see on many menus these days are lentils. These tiny beans are a “super-food” like kale. They are good for your colon and digestive health, high in fiber, good for your heart - high folic acid and magnesium for blood flow; they help to regulate blood sugar levels and cholesterol and are high in protein, minerals and antioxidants. Lentils come is several “colors” with the most typical being the green lentils which turn brown when cooked. They are easy to prepare and tasty, too. They pair nicely with fish, salmon, pork or smoked sausage.

Prep Time: 15 minutes
Cooking Time - 30 minutes
Tools: medium size mixing bowl, medium sauce pan
Serves: 2 

INGREDIENTS:
      • 1/2 cup dried lentils
      • 1/3 cup finely diced onion (or leeks)
      • 1/3 cup finely diced carrot
      • 1/3 cup finely diced celery
      • 1 heaping tablespoon tomato paste
      • salt and pepper
      • 2 cups chicken or vegetable broth 
      • 1 teaspoon red wine vinegar
      • 1 teaspoon finely chopped garlic
DIRECTIONS:

  1. Put the beans in a wire mesh colander and rinse them well. Pick out any beans that look bad. Place them in a heat-safe bowl and pour in boiled water to cover. Add 2 teaspoons of salt and stir. Cover the bowl and let sit for 15 minutes.
  2. In a medium size saucepan sauté the onions, carrots and celery in a little olive oil until just tender. Add tomato paste and garlic and cook about 2 minutes. Add 1-1/2 cups of the broth to the pot along with 1 teaspoon of salt and pepper and the vinegar. Drain the lentils and add them to the pot. Cover and simmer for 20 to 25 minutes - until the lentils are tender. If the liquid evaporates before they are done add the remaining 1/2 cup of broth to the pot.
    Sauteed cod with green lentils.
...............................................................

Friday, May 6, 2016

Super Thin Crispy Pizza

It was one of those evenings. Dinner time was approaching and I hadn't a clue what I wanted to have for dinner. Chicken again? No. A pasta dish? Just had it? Something with rice? Had rice twice already. Pizza? Yea - that's it. I love pizza! I always have tortillas in the fridge and they make a great, thin and crispy pizza without a lot of work. You can obviously use whatever you want or have handy on a pizza; you could just make a simple sauce and cheese pizza with some fresh basil, but here is what I did ... 
I preheated the oven to 425 degrees. Placed 2 tortillas on a round, perforated pizza pan (you can use a baking sheet) and once the oven was hot I put them in the oven for 5 minutes. When you take them out move an oven rack to the bottom shelf.
Meanwhile I fried up a small piece of breakfast sausage (Jimmy Dean) and chopped it up, sliced up some green bell pepper and grated some mozzarella cheese. I put the cheese in a bowl and added about 1/4 cup of grated parmesan, 2 teaspoons of oregano and a teaspoon of caraway seed. (The parmesan keeps the mozzarella from clumping and adds flavor as do the additional herbs.)
I opened a small can of tomato sauce and added a heaping tablespoon of tomato paste plus a teaspoon of oregano and a teaspoon of garlic powder. Mixed it up in a bowl, covered it and microwaved it for 1 minute. Then stir to mix well. (I always keep tomato paste in the freezer. I open a can, spread it out on a piece of plastic wrap to about 1/2 inch thick. Wrap it and freeze it. When I need a little I just cut off a piece and return the remainder to the freezer.)
I spread the tortillas with the tomato sauce, added the cheese, and then the sausage and green pepper. Then I placed the pan on the bottom rack. In about 15 to 20 minutes the cheese is bubbly and brown around the edges. The crust is super crispy. Eat up! (A version of this recipe is in my cookbook.)
...............................................................

Sunday, May 1, 2016

The MEATBALL EXPERIMENT

So… I love meatballs simmered in an Italian marinara. I could make a meal of just the meatballs forgetting the high-carb spaghetti. This led me to ponder making meatballs in some way without the work of making a marinara. Sure, I can buy a jar of marinara, but I dislike store-bought tomato sauces. All this led me to experiment with meatballs simmered in a simple beef broth. Basically these are mini meatloafs that get melt-in-your-mouth tender after absorbing the broth. I must say I was pleased with the outcome. (This recipe could easily be turned into a Swedish meatballs-like recipe by uncovering the pot near the end and reducing the liquid by half and adding a few heaping tablespoon of sour cream.) The next time I make this I’m going to add 8 ounces of sliced mushrooms that have been browned in butter in a skillet to the simmering liquid.

This recipe made a dozen large meatballs. I made them larger than you normally see a meatball in a spaghetti sauce.

Prep Time: about an hour including baking the meatballs
Cooking Time - 60 minutes to 2 hours - simmer as long as you like.
Tools: large mixing bowl, large covered pot, cookie sheet.

Serves: 4
INGREDIENTS:
 The Meatballs:
  • 1/2 pound ground pork
  • 1/2 pound ground chuck  (or use all chuck or pork)
  • 2 eggs beaten
  • 1 cup seeded rye bread crumbs (make in a blender)
  • 1/2 cup regular bread crumbs
  • 1/3 cup fine chopped carrot
  • 1/3 cup finely chopped onion
  • 1/3 cup finely chopped celery
  • 1/3 cup finely chopped green bell pepper
  • 1/4 cup finely chopped parsley
  • 1 tablespoon mustard
  • 3 tablespoons ketchup
  • 1 tablespoon worcestershire sauce
  • 2 teaspoons black pepper
The Simmering Liquid:
  • 4 tablespoons tomato paste 
  • 1 package of beefy onion soup mix (or onion mushroom) SEE NOTE BELOW 
  • 2 cans of low-sodium beef broth 
  • 1 cup water
  • 8 ounces of baby portobello/crimini mushrooms sliced
 DIRECTIONS:
  1. Preheat your oven to 400 degrees F. Place some parchment paper on a rimmed baking sheet. This is not required but aids cleanup and keeps the meatballs from sticking to the pan.
  2. Mix all of the meatballs ingredients in a large bowl. Form into 12 meatballs. Place on the baking sheet and bake for 40 minutes, turning once half-way through. Turning prevents burning and promotes even browning. When the meatballs are done, remove them to some paper towel to drain.
  3. In a large pot sauté the mushrooms in some butter until browned, then add all of the simmering liquid ingredients to the pot. Add the meatballs, bring the liquid to a boil, reduce to a simmer and cover. Flip meatballs occasionally. Simmer for at least 1 hour or up to 2 hours.
  4. If you want to add some veggies, peel some potatoes and cut them in chunks along with some carrots. Add them to the simmering pot in the last 20 minutes of cooking. When the potatoes are tender you are done.
NOTE: Onion soup mixes are very salty. If you prefer not to use them, just replace with a can of broth. In my experiment I did not add salt to the meatball mixture knowing they would be simmering in a salty liquid. And by adding potatoes at the end the salt in the liquid was absorbed by the potatoes. Potatoes are often used to remove saltiness.
...............................................................

Tuesday, April 26, 2016

Cannelloni

My father loved the cannelloni served at Ferd’s, a local Italian restaurant that sadly no longer exists. He ordered it almost every time we ate there. It can be an extremely rich dish depending on the cannelloni filling and the sauces you use. This recipe is a recreation of that version so loved by my father. I will offer other options as well. Cannelloni are a tubular pasta similar to manicotti. Typically, manicotti are stuffed with ricotta cheese and other ingredients and baked in a marinara. You can use cannelloni in a like manner. There are many recipes using various fillings. You can buy cannelloni tubes in a box or use some of the no-bake lasagna noodles or buy some fresh or frozen pasta sheets at a local market. Tubes are more difficult to fill than sheets which are simply rolled up around the filling.
This recipe will make about 10 to 12 cannelloni, depending on the kind of pasta you use.
  • If you use the box pasta, cook 12 of them only 1/2 the time as directed on the box. Drain and set aside to cool so you can handle them. Do not rinse them under cold water. 
  • If you use the no-bake noodles, boil 12 of them in some water just to the point they become pliable (about 3 minutes), remove to a sheet pan and keep them apart or they will stick together. 
  • If you use frozen pasta sheets, let them thaw and come to room temperature. Cut them in 3 inch by 6 inch pieces. 
Oven Temp - 425 degrees F. 
Cooking Time - about 40 minutes
Tools: 9” by 13” broiler-safe ceramic or metal baking dish (not glass)
Serves: 5-6 (2 cannelloni per person)


INGREDIENTS:
  • 12 cannelloni tubes or a box of no-bake lasagna noodles or pasta sheets as described above
THE FILLING 
  • 1/2 pound sweet Italian sausage (ground or if in casings, remove casings) 
  • 12 ounces ricotta cheese 
  • 1/2 box of frozen spinach thawed and water completely squeezed out 
  • 2 eggs 
  • 4 tablespoons fresh chopped parsley 
  • 1/4 cup grated parmesan cheese 
  • 1/2 cup shredded mozzarella cheese 
PARMESAN CREAM SAUCE 
  • 1 cup grated parmesan cheese 
  • 5 tablespoons unsalted butter 
  • 5 tablespoons flour 
  • 4 cups milk 
  • 1//4 teaspoon nutmeg 
TOPPING: 1/2 cup grated mozzarella cheese
DIRECTIONS: 
  1. Brown the sausage in a skillet. Once almost browned, use a potato masher to break it up. Remove and drain off the fat. Set aside. 
  2. In a large bowl mix together the ricotta, spinach, egg, parmesan, mozzarella and parsley. Mix in the cooled cooked meat. Set aside or refrigerate covered until you are ready to fill the pasta. 
  3. In a large saucepan melt the butter on medium heat. Add the flour and stir to blend. Let the roux cook for 2 minutes. Now slowly add the milk while stirring constantly. Add a little at a time. Bring to a boil while constantly stirring. Once it comes to a boil, turn it off and remove from heat. Mix in the parmesan cheese. 
  4. Grease a broiler-safe baking dish with some butter or cooking spray. 
  5. If using the cannelloni tubes you will need a small zip-lock type bag to create a piping bag. Fill the bag about 2/3rds full with some of the filling mixture. Squeeze out the air and seal the bag. Cut 1/2” off one of the bottom corners. Hold the piping bag in one hand and squeeze the filling into the pasta tube until it is filled. Place it, seam side down, in the baking dish. Add more filling to the piping bag as needed. 
  6. If using pasta sheets, place 2 heaping tablespoons of the filling near the end of shortest side of the sheet and shape it into a log. Then gently roll up the pasta to create a tube. Place it, seam side down, in the baking dish. 
  7. Arrange the tubes evenly in the baking dish. Leave some space between them so you have room for plenty of sauce. Pour the sauce over the tubes. Do not completely cover the tubes with the sauce. Leave a little of the tops exposed. Sprinkle top with 1/2 cup shredded mozzarella cheese. 
  8. Cover dish with foil and bake at 425 degrees F. until it is bubbling. Remove the foil and turn on the broiler. Lightly brown the top. Remove and let cool 10 minutes before serving. Serve with some additional grated parmesan cheese and chopped fresh parsley for garnish. 
VARIATIONS:
  • You can use a simple marinara instead of the parmesan sauce. In that case you will not use the broiler at the end so you can use a glass baking dish.
  • Omit the sausage in the filling, use a whole box of the frozen spinach for a meatless version. You can use either the parmesan sauce or a marinara.
...............................................................

Monday, April 11, 2016

Good Stuff - Two Favorite Brands

Recently a friend turned me on to Field Peas. Say what? Field peas are one of the oldest domesticated crops, cultivated for at least 7,000 years. Who knew? Apparently they are Southern mainstay so how have I never heard of them being from the South? There are several varieties. Anyway, Glory brand Field Peas with Snaps is what you must try. These peas are quite small, but very flavorful. They are seasoned with a bit of smoke - not too much. Never buy a can of baked beans again - get these instead. They taste like a bean, not a pea. For some reason pieces of snap green beans are also added, but there is very little of them in the can. All you do is just bring them to a simmer and serve. There are other brands of field peas with snaps, but I have not tried them. 

Apparently adding snap beans to field peas is also another Southern tradition. 
So one night I decided to add a can of green beans to the field peas thinking the smoky peas would also infuse the beans and make them taste like beans you had cooked all day with a big ol' piece of ham. I was right! The peas and beans make a delicious combo. Of course, the peas are good just by themselves, too.
QUICK RECIPE: Put your field peas in a sauce pan and stir in a can of drained green beans (see below). Add a little water so the contents of the pot are fully submerged. Bring to a simmer. Turn off the burner and cover the pot. Let them sit at least 30 minutes. This will help infuse the green beans with the smokey flavor of the peas. Reheat when ready to serve. You don't want to cook the peas a long time since they are already essentially cooked and could get mushy.
The field peas by themselves or with green beans added make a great side for any meal you cook on the grill. Think a perfect side for a BBQ. These peas would also be delicious with grilled salmon. It's popular to serve salmon over lentils, but these would be a great alternative to that.

That brings me to another best brand: Walmart's Great Value brand Whole Green Beans. For some reason, these green beans do not get mushy if you cook them a long time like your typical canned cut green beans. They are quite tender, but firm and really don't require long cooking like cut varieties. They don't have that strong green flavor you find in canned cut green beans. I will never ever buy a can of cut green beans again! I have tried Kroger's version of whole green beans. Not nearly as good.  
QUICK RECIPE: Dice 2 strips of bacon and fry in a saucepan until crisp. Add a small chopped onion and saute until soft. Drain the beans and add them to the pot. Add water to just cover. Add salt and pepper, bring them to a boil, turn off the heat, cover them with a lid and let them sit an hour. Then just reheat when ready to serve. Sometimes I add a can of drained diced tomatoes which gives them a really nice, fresh flavor.
NOTE: I always drain the water from a can of green beans. The water tends to be "strong." I prefer adding fresh water if I need it.
...............................................................

Tuesday, March 22, 2016

Taking Stock

So you baked a nice chicken for dinner or maybe you bought a roasted chicken at the market. DO NOT throw out that carcass! It's full of flavor and will make some delicious chicken stock which you can use when you need it and it will be so much better than canned.

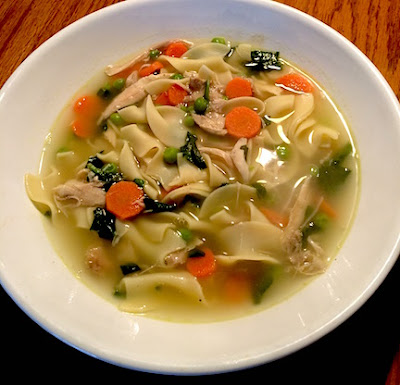
My lunch today - made with chicken stock I prepared after baking a chicken for Sunday dinner. 
Making stock is simple. Throw the carcass in a pot about the size of the carcass. Throw in any other bones even if they look useless. There is flavor in them. Throw in skin, too. Basically throw in everything left on the plate. Heck, throw in bones left on any plate! Toss in an onion cut in half. No need to peel it. Add a few stalks of celery and a carrot or two. Almost cover the carcass with water. Add salt and pepper. Cover and simmer for 2 hours
Strain the broth into a bowl or container. Refrigerate or freeze if you will not use it in a day or two. If you want to make a chicken soup let the bones cool then pick them over for pieces of tender chicken. Add them to the stock. 
Chicken Noodle Soup 
Cook some egg noodles with some sliced carrots, some peas and any other veggie you might have in the fridge that would go well. Drain, add your stock. Got some fresh spinach? Chop it up and toss it in. Simmer it for 5 minutes. Taste for salt. 
You now have a steaming bowl of fresh, homemade chicken soup. YUM.
...............................................................