Monday, December 28, 2015

Candied Pecans

At Christmas time I like to make these candied nuts and give them as little presents. Easy to make and irresistible. People love them. You can use almonds as well or a mix of the two. I thank Curt for sharing this recipe with me.
You don’t have to wait for Christmas to make them. Create your own party nuts by adding some cayenne pepper to make them spicy. Reduce the amount of cinnamon a tad and omit the nutmeg. Add bourbon to the egg whites instead of water. Use whatever spices you like!
 INGREDIENTS:
  • 1 lb of pecan halves or whole almonds
  • 2 egg whites beaten with 1 tablespoon of water 
  • 1/2 tablespoon or more vanilla extract
  • 1-1/2 cups of sugar (How much sugar depends on how sweet you want them. You can substitute light brown sugar just make sure you pack it down into the measuring cup when measuring.)
  • 1 tablespoon of cinnamon (use a full TBSP)
  • 2 teaspoons of salt
  • (option) 1 teaspoon nutmeg 
  • (option) for spicy nuts add 1 teaspoon or more of cayenne)
          DIRECTIONS:
  1. In a large bowl, whip egg whites and water to frothy; add vanilla, cinnamon, nutmeg, salt (and any options) and mix. 
  2. Add nuts and mix until nuts are well coated. 
  3. Add sugar and toss well to coat. 
  4. Next, the fun part: cover a LARGE cookie sheet with non-stick foil or parchment paper or a Silpat non-stick baking mat. It’s going to get sticky. 
  5. Spread the nut mixture evenly onto the sheet pan. 
  6. Pre-heat oven to 275 degrees F. 
  7. You will bake the nuts for 1 hour, turning with a spatula every 15 minutes. Each time lift the bottom of the mixture to the top and spread out.
Mixture will still be gooey when done, but dries hard when it cools. Just break it apart.
...............................................................

Monday, December 21, 2015

Chocolate Pecan Bark


Every Christmas I make bark. It’s so easy and so delicious. I give tins to friends as little presents. What I like about bark candy is that you don’t need any special candy making tools. It only takes about 30 minutes to make. I make a double batch, but you can half this recipe for a single sheet pan of bark.

Tools: baking sheet pans, double boilers, parchment paper
Makes 2 sheet pans of bark.

You’ll Need: 
  • 2 pounds of pecan halves (or whole almonds). I’ve used almonds, cashews and walnuts, but pecans just seem to go taste the best to me. They are sweet and softer to chew. Peanuts can work, too. You could also use a mix of 2 nuts.
  • 4 pounds of candy making chocolate. I like to buy the Ghirardelli Dark Chocolate Candy Making and Dipping Wafers. I buy it at Sam’s Club in a 2 lb. bag. I have seen it in some groceries around December, but it only comes in an 8 oz. bag. Just don’t mistake it for Baking Chips - they are not the same. While dark in color it is less bitter than regular dark chocolate and tastes more like a cross between milk chocolate and dark chocolate. You can buy candy making wafers at stores that specialize in cake and candy making. Chocolate specifically used for candy making is tempered so it remains shiny, has a good snap and melts smoothly in your mouth. That’s why you use candy making chocolate which has been tempered.
  • 6 ounces of white chocolate chips or a box of Baker’s Premium white chocolate.
Double Boiler: A double-boiler is an actual 3 piece pot you can purchase - a pot set in a pot with a lid, but you can create your own with a saucepan and a bowl. For candy-making you will want the bowl to be larger than the saucepan. The bottom of the bowl should sit down into the saucepan an inch or 2, not just sit on the rim of the saucepan.
An example of a bad double boiler. The top insert is smaller than the bottom saucepan. This could allow steam to get into the chocolate causing it to seize and become unusable.
A good double boiler - the insert sits down into the saucepan and is larger than the saucepan.


DIRECTIONS
Set up 2 double-boilers - a large one for the dark chocolate and a small one for the white chocolate. (See microwave instructions below if you prefer that method for melting chocolate.) Put 1 inch of water in a saucepan. Place a glass or metal bowl larger than the saucepan over the saucepan. The water should not touch the bottom of the top bowl. Bring the water to a simmer then turn it to low. You do not want it boiling. Just keep it just below a simmer. You want to melt the chocolate very slowly or it will burn. Be careful not to get any water into the melting chocolate or it will seize up and become useless. If steam is rising up around the bowl it might condensate and get in the chocolate. Steam means your water is too hot. Microwave: You can melt the wafers in a microwave, but that requires careful attention and patience. It’s easy to burn the chocolate in a microwave if you are not extremely careful. Follow the directions on the package carefully.

Place about 1/2 cup of the dark chocolate wafers in a double boiler. Stir with a spatula every so often. When it has almost melted add more chocolate and stir every so often. Keep adding chocolate until it is all melted and smooth. Remove the bowl from the sauce pan and wipe the bowl dry to avoid getting water in it. Add in the pecans and mix to coat. While you are melting the dark chocolate put your white chocolate chips (or chopped up Baker’s white chocolate bar) in the other double boiler and melt slowly, stirring often until smooth.

Spread the pecan/chocolate mixture out onto parchment lined baking sheets with a spatula. Make an even layer pressing it down and spreading it to the edges of the parchment paper.

You will now make a home-made pastry/icing bag… Take a small plastic zip-lock type bag and place it in a short glass and pull back the sides of the bag down around the side of the glass. Pour in your melted white chocolate. 


Zip up the bag, squeezing out as much air as possible before you seal it. Now cut a very small piece off of one bottom corner of the baggie. Now squeezing the bag distribute the white chocolate over the bark in a back and forth pattern creating long, thin lines across the bark about 1/2 inch apart. You don’t have to use all of the white chocolate - just enough to give it that bark look. I like to finely chop some extra pecans and just sprinkle them across the top. It makes it look a little more rough and “barky.”


Let cool in a cool place until it has hardened. Don’t refrigerate or the chocolate will lose its shine. Use a sharp heavy knife or pizza cutter to brake it up into chunks. You can break it up by hand but it gets messy and the warmth of your hands will start to melt the chocolate. Store in an airtight container.

...............................................................

Wednesday, December 9, 2015

Best-Ever Christmas Sugar Cookies


For as long as I can remember my mother baked sugar cookies for Christmas. As she has become advanced in age she is really not up to making them anymore. So a few years ago I surprised her with making them. I have never tasted a sugar cookie recipe that I think beats hers. I don’t where where she got the recipe, I just know they are delicious - buttery, a little sweet, thin and crisp. I make a batch and we split it. Yes, we eat the entire batch ourselves. Guilty pleasure. They are relatively easy to make, but they do take a while. I devote a few hours to making them and they are so worth every minute.

Tools: baking sheets, rolling pin, hand or stand mixer, basting brush, 
parchment paper, cookie cutters
Time: About 2-1/2 hours if you use 2 sheet pans or 3-1/2 if you use 1.
Makes 4 to 5 dozen cookies.
          INGREDIENTS
  • 2 sticks unsalted softened butter. Use butter, not margarine! 
  • 1-1/2 cups sugar 
  • 2 eggs, beaten 
  • 1 teaspoon vanilla 
  • 1/4 teaspoon fresh ground nutmeg 
  • 3-1/2 cups all-purpose flour, sifted 
  • 1 teaspoon baking soda
  • 2 teaspoons Cream of Tartar 
  • 1 teaspoon salt 
          FOR DECORATION
  • Egg white from 1 egg, beaten with a tablespoon of water 
  • Sprinkles - colored sugar crystals for decorating or just regular sugar 
          
          DIRECTIONS
  1. Set out the butter to soften. Once it is soft place it in a medium size mixing bowl and mix with a hand mixer or stand mixer until fluffy. Add sugar and “cream” the mixture until light and fluffy.
  2. Add the beaten eggs and vanilla and mix well. 
  3. Add all of the dry ingredients - flour, baking soda, cream of tartar, nutmeg and salt to a bowl and mix together with a fork or wisk. Don’t omit the nutmeg. It makes them extra good. 
  4. Add the dry ingredients to the wet and blend with the mixer until it looks like coarse sand. It will only take a minute or so. Form it into a disk about 2 inches thick, cover in plastic wrap and refrigerate for at least 1/2 hour so the dough becomes firm. You can refrigerate it longer but it will become very firm and hard to roll out. In that case cut off the portion you will use first and let it sit out for about 5 minutes. 
  5. When you are ready to begin baking …
  6. Prepare 2 baking sheets if you have 2, but if you only have 1 that’s OK - it will just take longer. Line your baking sheets with parchment paper or use a Silpat baking mat. 
  7. Set oven to 350 degrees F. 
  8. Prepare a surface for rolling out the cookies: dust a clean surface with some flour and have flour for adding to the surface and rolling pin as needed. 
  9. You want to use only enough dough to make a sheet pan of cookies. Keep the remainder of the dough refrigerated. It should not be at room temperature when you begin rolling out the dough or it will be too soft to work with. Take 1/4 of the dough and roll it to 1/4 inch thick. The dough may seem stiff at first but it will soften quickly. Dip a cookie cutter in flour and cut out your shapes. Place them on the baking sheets about 1 inch apart. Brush with egg white and sprinkle with a little of the sugar. Form leftover dough from the roll-out into a ball and roll it out for a few more cookies. If your baking sheet is full just refrigerate the leftover dough for the next batch. 
  10. Bake for 7 minutes on the center racks of the oven then rotate the sheets front to back and top to bottom and bake for 7 more minutes. They should be slightly dry and brownish brown just on the edges. Every oven is different so the amount of time in your oven may vary. Also, variations is thickness of your dough will effect the time. Check at 12 minutes. Lift up a cookie. If the bottom is light golden brown they are done. They will harden when they cool. Adjust time if you need to after the first batch. An extra minute can mean a burnt cookie! NOTE: dark coated and non-stick sheet pans cook hotter than the regular type of cookie sheet and take less time to cook. Do your first batch at 6 minutes then rotate if using these types of pans and check in 6 minutes for doneness.
  11. Place the baked cookies on paper towel and let them completely cool. 
  12. Start your next batch, but be sure the baking sheet has cooled down. Don’t use a hot baking sheet or it will cause the bottoms to over brown and the tops will not be done. If you have 2 baking sheets you can alternate them so they are cool when you begin baking. 
  13. Store cookies in an airtight container for up to 3 weeks … but they won’t last that long!
...............................................................

Wednesday, December 2, 2015

Amaretto Cake


The other day I bought the basic ingredients to make a bundt cake. I like bundt cakes because, while I do like cakes with frosting, I am really more a fan of the cake itself. I have a recipe for a rum cake which is a great basis for making all kinds of bundt cakes. In my cookbook I use my rum cake recipe to create other flavors like a chocolate-orange bundt cake. So the question was what to do with my bundt cake ingredients - make a rum cake or maybe something else. I took a look at my liquor cabinet and there it was - a bottle of Amaretto liqueur. Amaretto is an almond flavored liqueur. I had just seen a recipe for an almond cake on America’s Test Kitchen that looked amazing so my mouth was kinda watering for that flavor. This recipe is not near as complex as was that one, but it turned out to be very tasty none the less. You could serve a slice with some fresh berries and a dollop of whipped cream for a nice dessert. 
Bundt pans: there are basically 2 types of bundt pans. The one I used is a simple round pan with a flat bottom typically used for angel food cakes. The other type will have a more complex shape usually with flutes. The flat type works best with this recipe because of the sliced almond topping.

Tools: large mixing bowl, hand mixer or stand mixer, small saucepan, bundt pan
INGREDIENTS:
  • 1 box yellow cake mix or butter cake mix. Be sure it does not already contain pudding as many do nowadays. Read the label.
  • 1 box (3.5 oz) French vanilla instant pudding
  • 4 large eggs
  • 1/2 cup canola oil
  • 1/2 cup water
  • 1/2 cup Amaretto or an almond flavored liqueur
  • 1/4 teaspoon ground nutmeg
  • 4 to 6 ounces of sliced almonds
AMARETTO SAUCE
  • 1/2 stick butter
  • 1/4 cup water
  • 1/2 cup Amaretto
  • 1 cup sugar
  • 1/8 teaspoon ground nutmeg
DIRECTIONS:
  1. Grease your bundt pan with butter or cooking spray. Then add a couple of tablespoons of flour and toss it around in the pan so it is coated with the flour. Invert over the sink and tap to remove excess flour. Place pan in the fridge until it is needed.
  2. In a large mixing bowl add the eggs, water, oil, Amaretto and nutmeg. Mix with a hand blender (or stand mixer) until well blended. Add cake and pudding mixes. Blend for 2 minutes on low speed. Wipe the bottom and sides of the bowl with a spatula then blend for another minute.
  3. Spread the sliced almonds in the bottom of your bundt pan. Pour the mixture over the almonds evenly in the bundt pan. Even out the mixture with a spatula if needed.
  4. Bake at 350 degrees F. on the center oven rack for 45 to 50 minutes or until an inserted toothpick comes out clean.
  5. A few minutes before the cake is finished make the sauce. Melt the butter in a small saucepan, then stir in rest of the ingredients. Bring to a simmer and cook for 2 minutes. Be careful it can bubble over so you need to watch it and stir it.
  6. When you remove the cake from the oven pour the hot sauce all over the cake leaving about 1/4 cup in reserve. After 30 minutes place a plate, top side down, on the top of the pan and invert it to remove the cake. Pour the remaining sauce over the top. For best flavor, make a day ahead if serving to guests. This gives it time to develop even more flavor.
(To make a rum cake substitute rum for Amaretto and chopped pecans for almonds. For a lemon or orange cake substitute lemon juice or orange juice for the liquor, no nuts needed. Also add the zest of 1 lemon or orange to the mix if you have whole citrus. Omit the nutmeg in these versions.)

...............................................................

Wednesday, November 4, 2015

Party Food, part 2


Part 2 of my recipes for party food deals with hors d’oeuvres – which means, “apart from the main work.” These are one or two bite finger foods or spreads. There is a little more work involved with these as opposed to the boards discussed in Part 1 which are all cold foods you just set out and you’re done. Some of these require baking at some point during the party, and you may need to do batches of them to keep the plate refreshed and hot foods at least warm.

List of recipes that follow: Pigs-in-a-Duvet, Bruschetta and Crostini, Belgian endive scoops, kale chips, steamed shrimp, artichoke spread, rumaki, baked Brie, bocconcini, Country Ham biscuits.

Pigs-in-a-Duvet

OK, I changed the name to indicate that this recipe takes an ordinary pig-in-a-blanket up a notch. I have yet to go to a party where these are served and they are the first thing that disappears! Common, yes, but oh so good!

Typically these are a kind of smoked cocktail sausage about an inch an a half long wrapped in a dough and baked. Some people use crescent roll dough or biscuit dough. I like to use puff pastry. Puff pastry is much crunchier and lighter and makes them look a bit more elegant and taste even better. Puff pastry can be found in the frozen foods section where you find frozen pies, etc. Normally there are 2 sheets to a box. The sausages are usually found in the section where you find sausage products. They might be called cocktail franks or party franks or Li’l Smokies.

I like to simmer the sausages in a pot of water first for about 10 minutes. It removes a lot of the fat from the sausages and plumps them up. When they are finished boiling, drain and let them cool completely on paper towel. One sheet of Puff pastry will be enough to make 1 package of sausages. Set a sheet of the pastry out on a lightly floured sheet pan and let it begin too come to room temperature so it is more pliable about 7 minutes, but don’t let it completely thaw.

You will cut strips that are 1 inch wide by 2-1/2 inches long. Wrap a strip of the dough around the “piggie” and pinch the seam together. (OPTION: for a fancier look, cut the pastry into triangles that are 1 inch wide at the end and 2-1/2 inches long. Then roll them around the piggies.) The piggie should be sticking out both ends of the wrap. Place the wrapped piggies seam side down on a lightly greased sheet pan or a parchment paper lined sheet pan about 1-1/2 inches apart. Cover with a clean kitchen towel or some plastic wrap and put in the fridge until ready to bake. Just before you bake them brush the tops with an egg wash – 1 egg beaten with 1 tablespoon of water. Sprinkle some sesame seeds on top. Bake at 400 degrees for 20-25 minutes or until the pastry is golden brown. Serve with a good spicy mustard or a BBQ sauce for dipping.


Bruschetta and Crostini

Bruschetta (pronounced: bruˈsketta) is an appetizer from Italy consisting of grilled bread rubbed with garlic and topped with olive oil and salt. Variations often include toppings of tomato, vegetables, beans, cured meat, or cheese. You see it everywhere these days – it’s “trending!” It’s little sister, crostini, are thinner, smaller slices of bread prepared in a similar fashion. Both make nice appetizers and it’s not a lot of work. You just need some simple ingredients. You could make 5 or 6 kinds of bruschetta or crostini and they might be all you need at a party for appetizers. They can be a little messy depending on the toppings. Some toppings like to fall off! Be sure to have some plates or large napkins for your guests.

For bruschetta you need a loaf of good Italian crusty bread sliced 3/4 inch thick on the diagonal. If you have a grill, grilling the bread is the traditional method. If you have a grill pan that will work as well. You can always use the oven. Get your grill to medium heat or preheat your oven to 425 degrees. If Grilling: grill one side until lightly browned and flip to brown other side. If Baking: bake the bread slices on a sheet pan about 10 minutes and then flip and bake for another 5 to 10 minutes until lightly browned. Meanwhile, peel several large garlic cloves and cut in half. When bread is done immediately rub a garlic clove over one side of the bread. Then brush that side with a little olive oil and sprinkle with a little kosher salt and pepper. Let cool.

For crostini you need a French or ciabatta baguette. You cut the bread in 1/4 inch to 3/8 inch thick round slices. Brush both sides with olive oil. Grill as above or bake in a 350 degree oven as above for 12 or so minutes turning once until golden brown. Let cool.

You can then add some toppings to your toasted bread. Most commonly tomatoes are a topping with some basil. You finely dice up some Roma tomatoes and mix them with some finely chopped basil or parsley, a little salt and pepper and a dash of olive oil in a bowl then spread a little on each piece of bread. You can also add a dash of balsamic vinegar.

Here are some other variations for toppings:
  • gorgonzola cheese crumbled and mixed with a little ricotta cheese and some finely diced dried apricots or dried figs topped with a spring of arugula.
  • Sprinkle parsley on toasts; top with some chopped prosciutto, some shaved parmesan cheese and a drizzle of balsamic vinegar.
  • Thinly slice some crimini or baby bella mushrooms and sauté them in a little butter in a skillet until browned. Remove to a bowl and and mix in some chopped fresh parsley. Let cool. Place some of the mixture on the bread and top with some grated parmesan.
  • Buy an olive tapenade and spread it on the bread.
  • Get a carton of bocconcini - small mozzarella balls - cut them in quarters and mix with finely chopped Roma tomato and chopped basel. Toss with a little olive oil and balsamic vinegar. Spread over bread.

Belgian Endive “Scoops”

Belgian endive is a slightly bitter leaf vegetable. What is so cool about it is that you can separate it into individual leaves that will then be their own little scoops. They make an easy appetizer – no crackers needed. They are quite stiff and are perfect for filling. They make the perfect one-bite appetizer. You get creative with the filling. You place a heaping teaspoon of goodies at the root end of the spear. You do not fill them up. Arrange them in a concentric starburst pattern on a plate and you have a nice presentation. Some kind of crumbled cheese or a dollop of a cheese spread with some chopped nuts and some chopped parsley or chives is all you need. You can find Belgian endive in most markets. It can be a little pricey, but consider you do not need crackers which are pricey. Cut the root end off the endive, separate the leaves, put them in a bowl of cold water, rinse, drain, put in a bowl, cover and put them in the fridge until you are ready to fill them. You can fill them ahead of time, but not too long in advance as cheese can cause the leaf to begin getting soggy. Keep refrigerated until ready to serve.

TIP: If the endive doesn’t feel firm and crisp when you buy it, cut off the root ends, separate the leaves and put them in a large bowl of cold water and refrigerate for several hours.

Some “filling” ideas:
  • crumbled blue cheese, crumbled bacon or chopped pecans, chopped chive
  • crumbled Feta cheese, tiny diced cucumber and/or diced Kalamata olives, chopped fresh dill
  • a dollop of ricotta cheese, finely diced tomato, a dash of grated parmesan, and some chopped basil
  • a little herbed goat cheese, some chopped walnuts and a drizzle of honey


Kale Chips

Kale is all the rage so you better serve it at your party! LOL. Buy 1 large head of kale or a bag of the chopped, ready to cook kale greens.

If you buy a head of kale, remove the stems and tear leaves into large pieces like a potato chip size. 
You can remove the stems very quickly by grabbing the base of the stem with one hand and pushing outwards along the stem to slide off the leaves.

Wash and thoroughly dry the leaves before beginning.
If the leaves aren’t properly dried the water will steam the kale while baking and lead to soggy kale chips. After you wash them put them in a salad spinner to dry them. Don’t overcrowd the spinner. You will have to spin them in batches. No spinner? Spread them on a clean kitchen towel and place another towel on top and pat them dry. Be sure they are good and dry before you add the oil.

Toss with a little oil - olive or canola.
A little bit of extra virgin olive oil is all you need – 1/2 tablespoon of oil per baking sheet of kale chips. Spread leaves in a single layer on a large rimmed baking sheet. If you line the baking sheet with parchment paper on non-stick foil - that’s even better. (You can use 2 baking sheets if you are making a lot.) Do not crowd them or pile them up.

Now move them into a pile in the middle of the pan and drizzle the oil over the leaves. Toss with your hands to distribute the oil over the leaves making sure the oil really gets into them. Now sprinkle with 1 teaspoon of salt, 1 teaspoon of pepper and, if you like, 2 tablespoons of finely grated parmesan cheese. Now spread them back into a single layer. If you are making enough for 2 sheet pans you will put your racks in the middle of the oven and half way through cooking you will switch the pans – move the top one to where the bottom one and bottom one to top.

Bake.
Low baking keeps the chips from burning. Set the oven to 275 degrees F. After 15 minutes rotate the pans, and bake for another 10 minutes. If not crisp, bake another 5 or more minutes. They will get even crisper once you remove them from the oven and they begin to cool - about 3 minutes.

Tips: You can make these a day ahead and store in an air-tight container at a cool room temperature. If they need to be re-crisped a bit, toss them in a 275 degree F oven for a few minutes.


Maryland-Style Steamed Shrimp

I am including this recipe from my cookbook. Everyone enjoys shrimp - well, almost everyone!

Though this recipe is called Steamed Shrimp, they are actually boiled. Anytime I have served these shrimp people go crazy for them.

In Maryland they use shrimp in the shell. Of course, this requires peeling and that’s fine if you are sitting at a table, but for a party you don’t want guests having to peel a shrimp and getting their fingers sticky. So here are 2 versions that will simulate the actual Maryland style shrimp without using shrimp in the shell: one using shrimp that are peeled and deveined BUT NOT cooked and one for shrimp that are already peeled, deveined and cooked.

You will need at least 1 pound of shrimp - Medium will be 41-50 per pound or medium-large which is 36-40 per pound. 
USING UNCOOKED SHRIMP: 
  • Thaw the shrimp if frozen. You can put them in a bowl of tap water to speed up the thawing.
  • Use a large pot that will hold all the shrimp. Place the shrimp in the pot. Add water to just cover. Add 1 teaspoon of salt per 1 pound of shrimp.
  • Bring the water to a boil then reduce to a simmer. When the shrimp turn pink and white and curl they are done. Grey and translucent-ish is not done. Drain immediately and put them in a bowl.
  • Add the following per 1 pound of shrimp:
  • 2 tablespoons cider vinegar
  • 3 tablespoons Old Bay Seafood Seasoning
  • Toss the shrimp until they are well coated. Remove to a plate and let them cool. Eat them at room temperature or chill them.
USING COOKED SHRIMP
  • Any shrimp I have bought frozen that said they were cooked were not really cooked the way they should be. Thaw the shrimp if frozen. You can buy one of those shrimp rings or use frozen shrimp in a bag.
  • Use a large pot that will hold all the shrimp. Fill the pot half way with water. Add 1 teaspoon of salt per 1 pound of shrimp. Boil the water, remove it from the heat and toss in the shrimp. Let them sit in the hot water for 2 to 3 minutes. Depends on the size of your shrimp. When they turn curl drain the pot, but leave the shrimp in it. Add the vinegar and Old Bay as described above. Toss to coat and place on a plate.
Shrimp Sauce (for dipping)
Mix together:
  • 1/2 cup ketchup
  • 1 tablespoon prepared horseradish or more if you like it hotter
  • (optional - a few drops of lemon juice)

Artichoke Spread

This is an easy and delicious spread for bread or crackers or pita chips.
  • 2 can of artichoke hearts, drained and chopped
  • 1 cup mayonnaise
  • 1 cup grated parmesan cheese
Grease a 9” by 9” baking dish or round dish that is equivalent in size with a little butter. Mix the ingredients and spread into the dish. Bake at 350 degrees F for 40 minutes. Serve with small pieces of bread or crackers.


Rumaki

Chicken livers wrapped in bacon. Did you just squeal? About 2/3 of the people I know won’t touch them which is fine – more for me and other rumaki lovers! This is one of those love or hate things. They are fairly easy to make if you don’t mind handling chicken livers!

You will need about 1 pound of chicken livers. They are usually sold in a container in or around the chicken section of the market. Drain them. Cut large ones in half. They are slippery so be careful. In a medium bowl whisk together the following:
  • 5 tablespoons soy sauce
  • 2 tablespoons brown sugar
  • 1 can of sliced water chestnuts drained
  • 1, 1 inch piece fresh ginger, peeled and finely chopped or a heaping teaspoon of ground ginger
Add the livers, toss to coat, cover with wrap and refrigerate for 1 hour stirring every 15 minutes. 
Meanwhile, soak a bunch of toothpicks in water until you make the rumaki.

Heat oven to 425 degrees F. Strain the livers and chestnuts and save the marinade.

Using some good bacon that is not too thin, cut a strip into 3 equal lengths. Place a slice of the chestnut in the middle of each length and place a piece of liver on top. Wrap the bacon from both sides over the liver so that the bacon overlaps. Secure with a toothpick all the way through the liver and chestnut and out the other side. Repeat until all the liver is used.

Place on a foil lined baking sheet. Bake for about 25 minutes or when the bacon is done. Turn them and baste with the marinade a few times during cooking. You can also do these on a grill.


Baked Brie with Sliced Almonds, Dried Cranberries and Honey

Baked Brie is always an elegant cheese appetizer. There are many things you can use as toppings.


Ingredients:
  • 1 Brie round (about 13 ounces) – if it comes in a wooden box, save the bottom.
  • 4 tablespoons sliced almonds
  • 2 tablespoons dried cranberries (optional)
  • 3 tablespoons honey
Instructions:
  • Heat oven to 350 degrees F.
  • Spray a small ovenproof dish with nonstick cooking spray. If you have a wooden box bottom no need to do this step.
  • *Cut the top off the brie. (optional - see note below on removing the top)
  • Place the Brie in the dish. If you have a wooden box bottom, place the Brie in the box bottom and then place in a baking dish.
  • Sprinkle top with almonds and cranberries.
  • Drizzle honey over the top.
  • Bake for 15 minutes.
  • Provide a wide knife like a cheese knife for serving or if you had a box, leave it in the box and serve with a small spoon.
*It is optional whether you cut the top off the brie before baking. If you want to remove the top you can do this by using a fish line, some dental floss or a very thin wire. Place the brie wheel on a clean and open surface; with a sharp knife just pierce the top just below the surface to get a starting point. Now position the wire/floss just below the surface. Pull it slowly and carefully across the top to remove the top crust. This will leave you with a clean surface to work on. You can use a knife to shear off the top of the brie wheel. This, however, will result in a more uneven surface.

Other toppings:
  • chopped pecans and orange marmelade or apricot jam
  • chopped walnuts and apple chutney
  • fig jam or a peach chutney

Bocconcini

Bocconcini are small or mini balls of mozzarella cheese. They are quite versatile for making appetizers. You can merely marinate them in an Italian vinaigrette or buy some that already come in a flavored oil. Some even come with herbs. Here are some options. If you can only find plain ones in water I suggest marinating them in some olive oil and chopped garlic and fresh herbs like basil or parsley for a few hours first.


  • Take a small slice of prosciutto or good ham. Place a leaf of basil on it and roll it around the bocconcini. Secure with a toothpick.
  • Get a small cucumber. Trim off about 1/4 of an inch lengthwise. Using a vegetable peeler, peel a long wide strip from the cucumber. Wrap it around the marinated bocconcini twice and trim. Secure with a toothpick.
  • Buy a jar of roasted red peppers, cut them in 1/2 inch strips and wrap them around some marinated bocconcini.
  • Buy some cherry tomatoes. Cut off the tops, dig out the seeds and put marinated bocconcini in the holes.
  • Place marinated bocconcini, grape tomatoes and a basil leaf on a toothpick or small skewer like a kabob.
  • Place marinated bocconcini, olives and pieces of roasted red pepper on a toothpick or small skewer like a kabob.

Country Ham and Biscuits and Other Sandwiches

Small finger sandwiches are always good for a party and probably the best of all is a simple biscuit with some thinly sliced country ham. You can always make your own biscuits, but if you are not a baker you surely can buy frozen or refrigerated biscuits and just bake them. Pillsbury’s frozen biscuits are much better than the refrigerated variety that come in a tube. In fact, their frozen biscuits are amazing. Pillsbury’s Grands Mini Buttermilk biscuits work great. If you’t find the mini variety you could use the regular size buttermilk or Southern style. All you have to do is bake the biscuits according to directions, let them cool, split them and fill them with a little country ham.

Other types of small sandwiches might be some chicken salad or pimiento cheese salad on small buns or between some thin slices of crostini – toasted thinly sliced pieces of a baguette. Or you might do small “sliders” with meatballs and a dab of marinara. Some pork BBQ and a slice of pickle on a small bun would also be tasty.


CHICKEN SALAD
  • 2 cups shredded or chopped cooked chicken (or leftover turkey)
  • 1/2 cup chopped celery
  • 2 tablespoons finely chopped green onion
  • 4 tablespoons chopped pecans
  • 4 heaping tablespoons mayonnaise (or more as you like it)
  • 1 teaspoon salt and pepper
  • (option) 12 seedless grapes sliced in half
  • (option) 1/4 cup small diced apple
  • Mix all ingredients together and refrigerate.

PIMENTO CHEESE
  • 8 ounce block of sharp cheddar or white Vermont cheddar (avoid pre-shredded bags of cheese)
  • 3 tablespoons chopped green olives
  • 1, 4 ounce jar diced pimentos well-drained (put into a small fine-mesh strainer and press to remove water)
  • 1/4 cup chopped pecans
  • 2 or 3 heaping tablespoons mayonnaise - depending on how moist you want it.
  • Shred cheddar on a grater and put in a medium mixing bowl. Add all the ingredients and mix well. Refrigerate for a few hours to let flavors meld.
...............................................................

Friday, October 23, 2015

Bread Pudding with Bourbon Sauce


Bread pudding is a pretty simple dessert and oh, so comforting especially on a cold night. Best served warm about 15 minutes after removing from the oven. Serve with some bourbon sauce (see below) or vanilla ice cream. Heat leftovers in foil in a 350 degree oven for about 20 minutes. Don’t microwave as it tends to toughen bread.
Oven Temp: 350 degrees F. (DO NOT PREHEAT OVEN)
Cooking Time: 50 minutes to 1 hour or more
Serves: 6 (Double recipe to serve 12 and use a 9 by 13 baking dish)
Tools: large mixing bowl, 2-1/2 to 3 quart baking dish

INGREDIENTS:
  • 6 cups bread pieces about an inch squarish (see below)
  • 2 cups milk
  • 1 cup sugar
  • 1/2 stick melted butter
  • 2 beaten eggs
  • 1 tablespoon vanilla extract
  • 1/3 cup chopped or broken pecans or walnuts (Don't use nuts that are chopped too small - you want to see them and taste them.)
  • 1/2 teaspoon cinnamon
  • 1//4 teaspoon nutmeg
  • (option) 1 cup, 1/2 inch diced apple
THE BREAD: I like to use a bread that has some body - not ordinary white bread. You can use ordinary white bread and many do, but a heartier bread, I think, makes a better pudding. I typically use a French baguette or a some type of ciabatta loaf. Challah bread and brioche (an eggy bread) are also common breads used for a bread pudding and they work well, too. If you can find a whole grain or whole wheat baguette that would be a slightly healthier substitution. I have even seen some recipes that use stale croissants. Never tried it – could be interesting.

The bread typically is day old bread. This comes from the days when you bought your bread fresh for use that day - like they still do in European countries. By the next day the bread was getting hard. Old bread is not the same as bread that has been dried out. I saw a complete scientific explanation of this on America’s Test Kitchen. You want bread that has been dried out in an oven not set out on the counter overnight. It makes a better pudding.

Many recipes tell you to cut the bread in 1 inch cubes. I find this makes for a more dense pudding. I recommend tearing the bread in pieces about 1 inch. Irregular pieces will not mash down as easily and this creates an airier and lighter pudding.

DIRECTIONS:
So, start tearing up your bread and put the pieces in a measuring cup. Empty the pieces onto a baking sheet pan until you have 6 cups of pieces. Spread them out evenly. Put them in a 225 degree oven. In about 30 minutes or so they will be nicely dried out. Drying time will depend on the type of bread you use.
In a large bowl mix all the other ingredients together. (Don’t add hot melted butter to the eggs or it will scramble them. Add the butter after you have added the milk. (You can mix all of these ingredients ahead of time and refrigerate - just let it come to room temperature before mixing with bread.)

Place the dried bread in a buttered 9" by 9" baking dish or an equivalent oval or round baking dish. Pour the liquid over the bread. The liquid should almost come to the top of the bread, if not, add some additional milk.

Let it sit about 20 minutes so the bread absorbs the mixture. If you can, weight it down a little so the bread submerges in the liquid. You can put a plate with something heavy on top.

Place the dish oven on the middle oven rack, then turn the oven on to 350 degrees F.
When it has risen and the top is golden, its done. It may take a little longer than the time given above. It depends how wet it is.

BOURBON SAUCE (or use rum)
  • 1/2 stick softened butter
  • 3/4 cup powdered sugar
  • 1 egg yolk
  • 1/4 cup bourbon
Cream the soft butter (not melted) and sugar together. Add the egg yolk and mix. Pour it into a small saucepan and add bourbon. Heat to boiling, stirring constantly. Let simmer for about 3 minutes stirring constantly. Remove from heat.

It will thicken a little as it cools. Add 1 or 2 Tablespoons of bourbon right before serving. Sauce should be warm and poured over the warm bread pudding.
...............................................................

Monday, October 19, 2015

Party Food, part 1


As the Holidays approach it had me thinking about parties. And parties mean appetizers – small bites. This is a collection of ideas for tasty accompaniments to your holidays potables. It is important to be mindful of dietary restrictions and avoidances that many people have these days, so make sure your bites offer something for everyone.

We’ve all eaten a lot of pigs-in-a-blanket, crudité (raw vegetables and dip), mini-quiches and cheese balls! Boring, right? Well, I still love my pigs in a blanket and am always happy to see them. Not very elegant, but I like them. Let’s talk about some other options for treating your guests to something special and different. These options require no baking. They are simple and easy to put together.

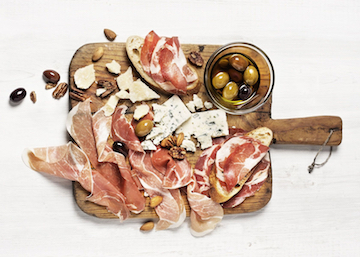
In this post I will explain how to create a cheese board and a charcuterie board – a board of cured meats. Sometimes these are combined - cheese and meats on a single board or a couple of boards with the addition of some fruits, nuts, olives, etc. I will also make a suggestion for how to make a better raw vegetable platter – crudité. These 3 items make for a well-rounded spread offering a variety protein, vitamins, complex carbs and fiber as well as something for everyone who may have dietary restrictions. I also give some links to videos and articles related to the topics.

* Be sure to have some small plates so guests can create a plate rather than just stand and “graze” at the food table.

Cheese Board

Forget the cheeseball! Put together a cheese board. Cheese is a protein and that’s good to have with alcohol. The protein balances the sugar in alcoholic beverages and brings down your glycemic index. The classic cheese plate usually has 3 to 5 types of cheese – hard cheeses, soft cheeses and pungent cheeses like a blue cheese or goat cheese. The amount of cheese obviously depends on how many people you are serving. If you don’t know much about cheese go to a shop that specializes in cheeses where someone can give you advice. Just tell them you are making a cheese board - what cheeses would they recommend. If it’s a good cheese shop they will let you sample the cheese before you buy. Always buy the cheese is a block, wedge or round, not sliced or crumbled. If a cheese shop isn’t available to you then here are some sure-fire cheeses you should be able to find anywhere:

Hard Cheeses: smoked gouda, havarti, white cheddar, muenster
Pungent Cheeses: blue cheese, goat cheese (chevre) with herbs
Soft Cheeses: camembert or brie (I will have a recipe for baked a Brie in my next post.)

Fondue has come back into “style.” Hot, melty cheese … yum! A fondue pot could be a nice centerpiece to a cheese board.

To create a cheese board you will need:
  • A large board or plate or 2. Try to use something flat like a large wood cutting board or a large, shallow serving plate used for a turkey.
  • Cheese knives. Cheese knives are short and wide, similar to a butter knife. You can buy some cheap ones at a store if you don’t have any.
  • A variety of crackers and/or bread. Stay away from highly seasoned crackers - you want the cheese to shine, not the cracker. Buy a baguette and slice it in small rounds.
  • Some red and green grapes. These are a typical addition to a cheese plate. They are good with cheese and also offer some color when you arrange the board.
  • A small bowl of honey which goes really well with camembert and brie
  • Some people like to add some dried fruits like apricots to the plate or slices of apple or pear. If you use apples or pears you need to toss them in some water with lemon juice first so they do not turn brown while on the plate.
  • You could also add some pitted olives, like kalamata, in a small bowl.
  • Walnut or pecan halves or cashews are a nice addition as well sprinkled around the plate.
Arrange the cheese board:
Prepare the board about 1/2 hour before the party so the cheese can come to room temperature. Leave the cheeses in blocks, don’t pre-cut them up in squares. The cheese will dry out. Let your guests slice what they want.

You want to spread out the blocks of cheese and intersperse them with the crackers/bread, grapes and other items you might add. Often the grapes are left in a bunch and people pick off the grapes they want, but this means there are a lot of hands touching the grapes. Instead, pick them off the branch and put them in mounds on the board or in small bowls.

It’s always a nice touch to cut one slice from the cheese and set it at the block of cheese so guests are not intimidated by being the first one to cut into it.

It’s also nice to place a small card next to the cheese with its name so guests know what they are tasting.

Do pre-slice the bread if you use it.

Don’t overload the board – leave space for guests to slice the cheese.

You can always add crackers and bread as needed.

HELPFUL VIDEOS: CHEESE BOARDS        video 1    video 2    video 3

Charcuterie (shar-koo-terr-ee) Board


You might also have a board of thinly sliced cured meats – again, protein. Wikipedia defines charcuterie as “the branch of cooking devoted to prepared meat products, such as bacon, ham, sausage, terrines, galantines, ballotines, pâtés, and confit, primarily from pork.” There are a host of cured meats that you may have never tried. Again, if you know very little about cured meats, go to a place that specializes in them and talk to the butcher. They will give you samples. Always have the meats sliced very thinly so you can fold them when arranging the board. If seeking out a butcher is too daunting or not available here are some cured meats you can find most places:
  • Sausages: salami, pepperoni (not the small kind typically used on pizza), capicola, mortadella, soppressata, andouille and chorizo.
  • Meats: Black Forest ham, country ham, prosciutto (an Italian ham)
  • Paté: a mixture of cooked ground meat and fat minced into a spreadable paste; liver paté is perhaps the most common.
You may see pre-made packages of cured meats at your market in the Deli section which might include 2 or 3 types of cured meats. 
Arrange the charcuterie board:
You will create “piles” of the meats. Larger sliced meats like proscuitto, salamis and ham can be loosely folded in half and then in half again. The type of meat and it’s flexibility will determine how you arrange the board.
  • Avoid laying out the meats in rows of slices. Intersperse the meats with small slices of french bread and crackers if you have a paté.
  • Add a bowl of a spicy mustard or a fig jam
  • A bowl of small pickles and/or olives and/or pepperoncini (mild/hot peppers)
  • Include a small fork for people to pick up the meats or toothpicks for slices of small round sausages like andouille

Crudité - vegetable platter
This is not your usual crudité platter – so please read on ...
Considering that your guests will be imbibing it’s nice to serve something healthy! Raw veggies are an easy solution. One problem with raw vegetables is that they can be pretty bland - hence the fattening dips we use to enhance them. Try this instead. Don’t buy a vegetable tray at the market! The veggies are old. You will buy fresh veggies and blanche them so they are just slightly soft and marinate them in a vinaigrette. Then there is no need for a fattening dip just toothpicks. Veggies that work well this way: broccoli, cauliflower, carrots, asparagus and a couple you don’t need to blanche: cucumber, zucchini, grape tomatoes and olives.

Cut the broccoli and cauliflower into bite-sized florets.

Asparagus: you will need spears that are at least 1/2 inch in diameter, not those pencil-thin kind. Place your fingers in the middle of a spear and the fingers of your other hand at the end of the spear. Bend the spear until it snaps. Discard the end piece. This guarantees you will not be eating a woody, fibrous piece of asparagus. Cut the remaining piece into1-1/2 inch pieces.

Carrots: please don’t buy those prepared “baby” carrots. They are tasteless and god knows how long they have been in that bag! Better to buy fresh ones, peel them and cut them diagonally into bite-sized pieces about 1 inch long depending on thickness.

Cut the cucumber and zucchini into 1 inch rounds then cut the rounds in half or fourths depending on the size so the pieces are bite-sized.

Prepare an ice bath: a large bowl filled with cold water and some ice.

Steam the veggies: Add a little water to a large pot and salt it. If you have a steamer, use that. Steam the broccoli and cauliflower for about 2 minutes. Don’t let it get soft – it needs to remain a little firm. Test with a sharp knife. Remove the veggies to the ice bath to stop the cooking. Steam the asparagus for about 1 minute and remove to the ice bath.

After 5 minutes in the ice bath you can drain the veggies. Put them and any other veggies into a large bowl. GENTLY toss with a vinaigrette dressing. You can make your own or use a bottle variety. Cover and refrigerate for at least a few hours tossing occasionally. Just before serving drizzle with a little fresh lemon juice and give them one final toss. Spread them out on a plate lined with Romaine lettuce leaves and have some toothpicks nearby.

...............................................................

Sunday, October 4, 2015

Quesadillas

You might think quesadillas are just an appetizer, but you can easily make a meal of them. And they are so easy to make. A basic quesadilla might contain just 2 ingredients, but you can, of course, add all kinds of stuff. Typically quesadillas have some kind of shredded or thinly sliced cheese and then a few other ingredients. Quesadillas are great way to use up leftovers of this and that in the fridge. Be creative with what you put in them – use combinations of things you like.
You don’t want too many items as the quesadilla should not be more than 1/2 inch thick. Cheese plus 2 additions and maybe some herbs is all you really need. You'll need about 1/3 to 1/2 cup of cheese per tortilla and only about 2 or 3 tablespoons of other ingredients. Don’t overload them! Keep them simple. 
You will use 8- or 10-inch flour tortillas. You can use the whole wheat variety as well or the flavored ones like spinach or tomato, etc. 
As you would do if doing a stir-fry, get your mise en place going – that fancy French expression which means have all of your ingredients ready – shredded, chopped, julienned, etc., before you begin assembly. 
There are 2 methods for cooking the quesadillas - in an oven or in a large fry pan. Use the oven if you are making a lot of them. If you are only making 2 or 4 use a fry pan.
FRY PAN: 
  1. Place the pan on medium heat. When warmed place a tortilla in the pan. After 15 seconds flip it. After 15 more seconds remove it to a plate. This makes it more pliable for folding. 
  2. Once you have warmed the tortillas spray the pan with some cooking spray. Now assemble your quesadillas. 
  3. You will spread your ingredients on one side of the tortilla – sprinkle some cheese over the bottom, then your other ingredients and top with a little more cheese. Fold it over, press it down. 
  4. Now place 2 folded quesadillas in the pan. Keep an eye on them. Once they brown (in 2 to 3 minutes) gently flip them over with a wide spatula and fry until brown on the second side. 
  5. Remove to a plate and let cool slightly before you cut them up. Give the cheese a chance to set up. Use a pizza cutter to cut the half-moon into 3 or 4 pieces.
OVEN METHOD: 
  1. Preheat the oven to 400°F. Line a baking sheet with some foil (non-stick foil if you have it). Place the tortillas on the sheet and put them in the oven for 1 minute to “relax” them. Remove from the oven. 
  2. Spread your ingredients on one side of the tortilla – sprinkle some cheese over the bottom, then your other ingredients and top with a little more cheese. Fold it over, press it down and return to the oven for 5 to 8 minutes. 
  3. Remove to a plate and let cool slightly before you cut them up. Give the cheese a chance to set up. Use a pizza cutter to cut the half-moon into 3 or 4 pieces. 
Toppings: quesadillas often have a topping or a dipping sauce. You can drizzle a little over the top after you cut them up or serve on the side for dipping. 

Some quesadilla combinations:
BASIC CHEESE QUESADILLA:
The Cheese: use 3 different cheeses - cheddar, jack, feta / cheddar, swiss, jack / cheddar, parmesan, provolone, / american, swiss, havarti ... etc. 
Add one of the following options:
  • thinly sliced green onion or diced green chiles (canned) or diced jalapeños
  • diced tomatoes or dollops of salsa
  • thinly sliced roasted red peppers
Toppings: sour cream or salsa or salsa verde or guacamole.
_____________________________________________________________
MEXICAN QUESADILLA:
The Cheese: Shredded cheddar or shredded Mexican blend, Shredded Monterey Jack or Pepper Jack
Add of few of the following options:
  • thinly sliced green onion or diced green chiles (canned) or diced jalapeños
  • diced tomatoes or dollops of salsa
  • corn
  • black beans or refried beans
  • frozen chopped spinach thawed and water squeezed out
  • thinly sliced roasted red peppers
  • shredded chicken
  • chopped crispy bacon
Toppings: sour cream or salsa or salsa verde or guacamole. 
______________________________________________________________ 
GOAT CHEESE QUESADILLA:
The Cheese: goat cheese
Add of few of the following options:
  • thinly sliced green onion
  • roasted garlic
  • chopped fresh chives or chopped basil or fresh parsley or dill
  • chopped sun-dried tomato
  • chopped crispy bacon
  • salami
Toppings: salsa or salsa verde or garlic oil
______________________________________________________________  
GREEK QUESADILLA
The Cheese: crumbled Feta cheese
Add of few of the following options:
  • thinly sliced green onion
  • chopped sun-dried tomato
  • thinly sliced mushrooms (raw or sautéed)
  • sliced olives - green or black or Kalamata or an olive tapenade
  • drizzles of olive oil 
  • salami 
Toppings: sour cream or salsa or salsa verde or marinara or garlic oil
______________________________________________________________  
PIZZA QUESADILLA
The Cheese: Shredded mozzarella or provolone
Add of few of the following options:
  • thinly sliced green onion
  • diced tomato or dollops of marinara 
  • thin slices of bell pepper
  • chopped pepperoni or salami or thin slices of prosciutto
  • thinly sliced mushrooms (raw or sautéed)
  • thinly sliced basil
  • drizzles of olive oil
Toppings: marinara or garlic oil
______________________________________________________________  
FRENCH QUESADILLA
The Cheese: Thin slices of Brie or Camembert or crumbled Blue Cheese 
Add of few of the following options:
  • dollops of apricot jam
  • thinly sliced green onion
  • thin slices of prosciutto chopped
______________________________________________________________  
SWISS QUESADILLA
The Cheese: shredded Swiss or Gruyère 
Add of few of the following options:
  • thinly sliced green onion
  • diced tomatoes
  • thin slices of bell pepper
  • frozen chopped spinach thawed and water squeezed out
  • thin slices of diced prosciutto or ham or country ham chopped
...............................................................